Body

How To: Add Shared HP Printer for Facilities lunch room
Owning ITS Area:
Helpdesk
Priority:
low
Need for the Article:
Perform maintenance on a shared non-Konica contract HP printer. Specifically for the Facilities department in 2-980 lunch room.
This covers both adding the printer on users and how to turn on the HP printer share for the computer in the event of an upgrade.
Last Date Reviewed:
June 11, 2025
How to add the already shared HP printer
Once you are correctly connected to our network, here are the steps to add a printer:
- Type "printers" in the start menu search box on the toolbar and open the System Setting icon that appears on the right
- At the very top of the window, click on the “+ Add a printer or scanner” button
- Scroll all the way to the very bottom of the list of printers
- Click the blue text "The printer that I want isn't listed"
- In the dialogue window, choose "Select a shared printer by name" and then type - \\P2-980-06\HP Universal Printing PCL 6 Facilities lunch room
(Please note the correct slash symbol “\” are used)
- Click "next", then wait for it to install.
- When you get a confirmation that your printer has been added, click "Next"
- Choose “Print a test page” to test your printer, or select "Finish"
How to add the HP printer to the P2-980-06 Computer
Once you are correctly connected to our network, here are the steps to add a printer:
- Type "printers" in the start menu search box on the toolbar and open the System Setting icon that appears on the right
- At the very top of the window, click on the “+ Add a printer or scanner” button
- Scroll all the way to the very bottom of the list of printers
- Click the blue text "The printer that I want isn't listed"
- In the dialogue window, choose "Add a local printer or network printer with manual settings” and then click “next”
- Select “Use an existing port” and look in the drop-down menu for : DOT4-001 (HP Print Device)
- In the “install the printer driver” window, the “HP Universal Printing PCL 6 (v7.7.0)” should already be selected, click “Next”
- Choose “Use the driver that is currently installed”, click “next”, leave the printer name as-is, click “next” then wait for it to install.
- It will ask you for Printer Sharing. Leave all field as-is and ensure “Share this printer so that others on your network can find and use it” is turned on then click “next”.
- Choose “Print a test page” to test your printer, or select "Finish"
How to create the HP printer share
In the event the front desk computer that is connected to the HP printer needs to be replaced, these instructions will show you on how to create the share again:
- Ensure this computer is using the SCCM image. Intune image has been locked down from allowing network discovery for cyber security.
See this article on how to perform an SCCM image a new computer.
- Ensure the computer is set up and joined the AD.CNC.BC.CA domain.
- Google “HP LaserJet P4515x” and choose the first option. OR visit https://support.hp.com/ca-en/drivers/hp-laserjet-p4510-printer-series/model/3558895
Expand "Driver-Univeral Print Driver", then download "HP Universal Print Driver for Windows PCL6 (64-bit)"
- Unzip, then follow the prompts to install.
- Open the printer folder. (To learn how to open the printer folder, see “How to open the Devices and Printers window.”)
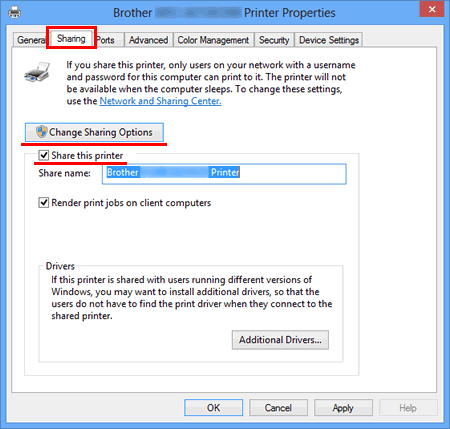
- Right-click HP [model name] and then click Printer properties.
- Open the Sharing tab and check Share this printer. (If you see the Change Sharing Options button, click on it.)

- Rename the label printer or the Share Name field to "Facilities HP lunch room Printer"
- Click Apply then click OK.
- For Windows 11, use the Windows Search bar to search "Manage Advanced Sharing Settings", then skip to step 15.
- Open the Control Panel.
- Click Network and Internet. (Windows 10/Windows 8/Windows 8.1 only)
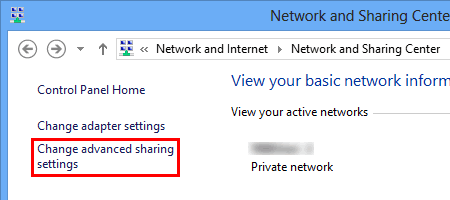
- Click Network and Sharing Center.
- Click Change advanced sharing settings.

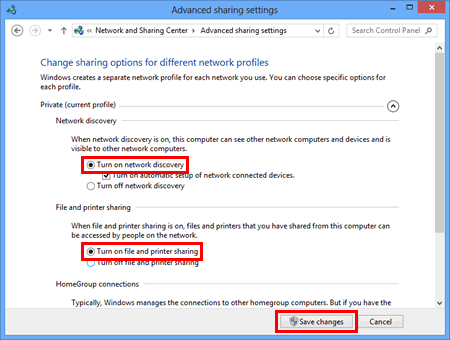
- Check Turn on network discovery and Turn on file and printer sharing, click Save changes.
