Title: How To: Access Horizon Virtual Desktop
|
Audience: Staff / Faculty
|
Applies to: VMWare Horizon
|
Category: Software and Applications Support
|
Prerequisites: Active CNC Account, Access to Horizon (manager approval required)
|
| |
Problem: N/A
|
| |
Description / Summary: Guide to accessing and configuring VMWare Horizon for first use
|
| |
In order to proceed with the following instructions, your manager must submit a request to add you to the Horizon security group. Once you've been added, the instructions will work. The request may be created here: Tools & Applications Access Request
Installing VMWare Horizon Client
The College of New Caledonia uses VMware Horizon to deliver Virtual Desktops to as necessary. This allows users to securely connect to a Windows 10 Desktop that resides on the CNC network, and has access to CNC software and shared drives, all from your own device at home (or anywhere with an internet connection).
-
To start, navigate to the following address in a Web browser:
https://horizon.cnc.bc.ca
You will see the following options on the page:

I.T. Services recommends using the full Horizon Client for the best user experience. Click on the “Download VMware Horizon Client” link on the bottom.
Alternatively, click the “HTML Access” link and enter you CNC credentials, to connect to the Virtual Desktop directly from the Web Browser.
-
You will be taken to a webpage with the following link:

Click “View Download Components.” By Omnissa Horizon Clients
-
On the next page, click the blue “Go to downloads” button (If you use a Mac, select the appropriate link further down the page):

-
Click on "Download Now" on the far right:

-
Find the file that you just downloaded, or run it directly from your browser.
If using Google Chrome, click the downloaded file in the lower left corner:

If you cannot find the file, it is most likely located under your “Downloads” folder.
-
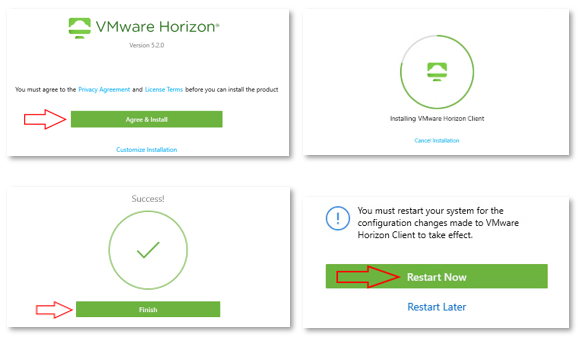
Go through the installation process for the Horizon Client and reboot your computer:

-
Locate and open the “VMware Horizon Client” shortcut on your desktop or start menu
Double-Click the “Add Server” button:
 Enter “horizon.cnc.bc.ca” into the name field, then click Connect:
 Adding the server will only have to be performed on the first launch. It will be saved for future use.
-
Enter your CNC Username and Password, then click “Login”
 If you do not know your CNC Username and Password, you must set up your account at the following link: https://tools.cnc.bc.ca/cncaccount/
-
After logging in, you will see the Virtual Desktops available to you.
Double-Click on the desktop you wish to connect to:
 After a moment, you will see your Virtual Desktop, and can begin working with it!